Are you searching for a dessert that perfectly balances sweet and savory, rich and delicate? Then look no further! These Chocolate Salted Caramel Tarts are a true culinary masterpiece, a symphony of textures and flavors that will leave you utterly enchanted. The crisp, buttery tart shell provides a wonderful foundation for the luscious, molten chocolate ganache and the star of the show – a homemade salted caramel so good, you’ll want to eat it by the spoonful. In this post, we’ll embark on a step-by-step journey to create these heavenly treats, ensuring that even beginner bakers can achieve professional-looking results.
Crafting the Perfect Tart Crust: A Buttery Foundation
Before we dive into the gooey goodness of caramel and chocolate, we must first construct a reliable and delicious base: the tart crust. This is where it all begins.
Ingredients for the Tart Crust:
- 1 1/2 cups all-purpose flour
- 1/2 cup powdered sugar
- 1/2 cup unsalted butter, cold and cubed
- 2-3 tablespoons cold water
Step-by-Step Instructions:
- First, in a large bowl, whisk together the all-purpose flour and powdered sugar. This ensures that the sugar is evenly distributed, preventing any pockets of sweetness.
- Next, add the cold, cubed butter to the bowl. Using a pastry blender, your fingertips, or a fork, cut the butter into the flour mixture. The goal here is to create a coarse, sandy mixture with pea-sized pieces of butter. It’s crucial to keep the butter cold during this process, as warm butter will lead to a tough crust.
- Subsequently, begin to add the cold water, one tablespoon at a time. Mix gently after each addition, until the dough just begins to come together. Be careful not to overwork the dough, as this can also result in a tough crust.
- Once the dough has formed, gather it into a ball, flatten it into a disk, and wrap it tightly in plastic wrap. Refrigerate for at least 30 minutes. This chilling time is essential; it allows the gluten in the flour to relax, which makes the dough easier to roll out, and ensures the butter remains cold.
- After the dough has chilled, take it out of the fridge and place it on a lightly floured surface. Roll it out into a circle about 1/8-inch thick.
- Carefully, transfer the rolled-out dough into your tart pan. Gently press it into the bottom and up the sides of the pan. Trim any excess dough hanging over the edge. If you’re making individual tarts, you can use a cookie cutter to cut out circles and carefully press them into your tart tins.
- Finally, prick the bottom of the tart shell with a fork. This is an important step to prevent the crust from puffing up during baking. Place it in the freezer for 10 minutes before baking.
- Preheat your oven to 350°F (175°C).
- Bake the tart shell for 15-20 minutes, or until golden brown. Let it cool completely before filling. This pre-baking process, known as blind-baking, creates a solid shell to hold your luscious fillings.
The Golden Elixir: Crafting the Salted Caramel
Now that we have a delicious base, it’s time to move onto the star of the show, the salted caramel. This is not your average caramel; the touch of sea salt elevates the rich sweetness to another level.
Ingredients for the Salted Caramel:
- 1 cup granulated sugar
- 1/4 cup water
- 1/2 cup heavy cream
- 1/4 cup unsalted butter
- 1 teaspoon sea salt
Step-by-Step Instructions:
- Firstly, in a medium-sized saucepan, combine the granulated sugar and water. Stir gently to ensure all the sugar is moistened.
- Then, place the saucepan over medium heat. Do not stir once the sugar mixture starts to boil. Swirl the pan gently if needed to distribute the heat.
- As the sugar begins to melt, it will gradually turn golden, then amber. Watch it carefully, as it can burn quickly at this stage.
- Once the sugar is a deep amber color, remove the saucepan from the heat. Be careful as the caramel will be very hot.
- Immediately, add the heavy cream, unsalted butter, and sea salt. The mixture will bubble up vigorously. Stir constantly until everything is fully combined.
- Next, return the saucepan to low heat. Stir the caramel for about one or two minutes. This will ensure that all the ingredients come together and create a smooth and luscious caramel.
- Finally, set the caramel aside and allow it to cool slightly before pouring it into the tart shell. This cooling process helps thicken the caramel, making it easier to work with.
A Chocolate Dream: Creating the Ganache
To complement the rich caramel, a velvety smooth chocolate ganache is the perfect pairing. It adds another layer of texture and an intense chocolate hit that perfectly balances the sweet and salty elements.
Ingredients for the Chocolate Ganache:
- 1 cup dark chocolate, chopped
- 1/2 cup heavy cream
Step-by-Step Instructions:
- First, place the chopped dark chocolate in a heatproof bowl.
- Next, heat the heavy cream in a small saucepan over medium heat. Bring it to a simmer. Be careful not to boil it over.
- Then, pour the hot heavy cream over the chopped chocolate. Let it sit for one minute to allow the warmth to melt the chocolate.
- After a minute, stir gently until the mixture is smooth and glossy.
- Finally, set the ganache aside to cool slightly. It will thicken as it cools down.
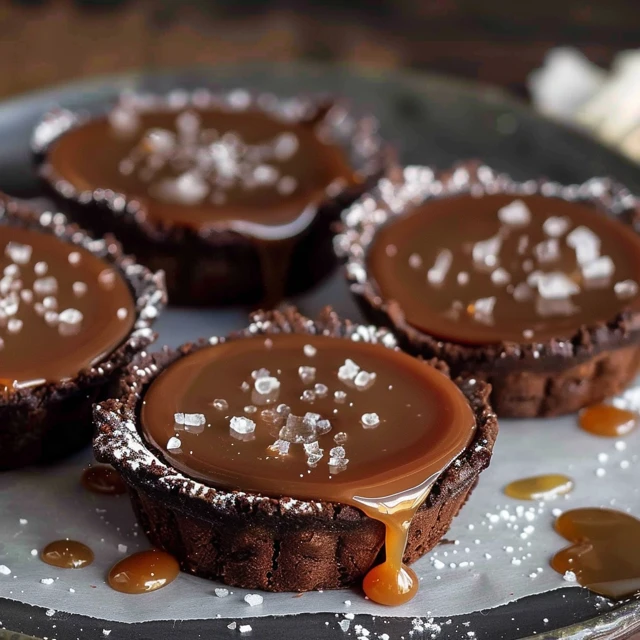
Assembling the Masterpiece: Layering the Flavors
Now comes the most rewarding part: bringing all our elements together to create the final tarts.
- Start by pouring the slightly cooled caramel into the baked and cooled tart shell. Ensure the caramel is evenly distributed.
- Following, allow the caramel to set slightly. This prevents the ganache from mixing with the caramel during the layering process.
- Subsequently, pour the chocolate ganache over the set caramel. Spread it gently to create a smooth and even layer.
- To finish, sprinkle sea salt flakes over the top of the ganache. The salt flakes not only add a pop of flavor but also create a beautiful visual element.
- Finally, refrigerate the tarts for at least one hour to allow the ganache to set completely.
Serving and Savoring: The Ultimate Indulgence
After the tarts are fully set, they are ready to be served. These Chocolate Salted Caramel Tarts are perfect for any special occasion, or simply as a treat to yourself. They are incredibly rich, so small slices are usually more than enough.
In conclusion, making these Chocolate Salted Caramel Tarts requires a little time and patience, but the end result is well worth the effort. With their crisp buttery crust, sweet and salty caramel, and rich, smooth chocolate ganache, these tarts are a truly unforgettable dessert. So go ahead and gather your ingredients and embark on this culinary adventure. We hope you enjoy creating these decadent delights as much as we do! You’ll find that these tarts are a true labor of love, perfect for sharing with loved ones, or for a moment of pure, unapologetic self-indulgence. Enjoy!